
Manage your Processes
The process section is the reflection of the processes in place for your organisation. Basically, this where new employees can go to find the rules of engagement within the company on all parts.
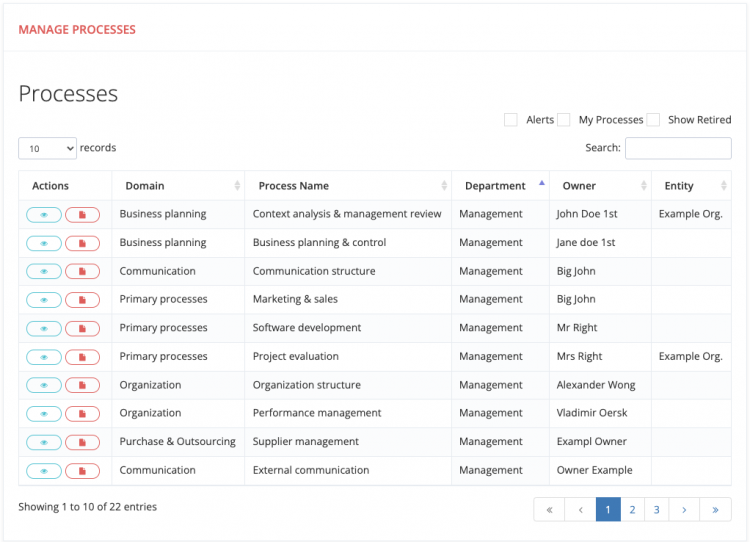
- The first selector lets you choose the amount of processes to display in your screen.
- The "Alerts" Checkbox lets you display only Processes that have an alert to them due to an overdue audit date (According to the settings an audit should have been performed but is missing) see audit planning.
- The "My Processes" Checkbox displays only those processes where you are the owner
- The "Show Retired" Checkbox will display processes you deactivated/retired
- The "Search" box will allow you to search within the processes on certain keywords.
These selectors work simultaneously and based on the choices made the grid will display accordingly. Each column can be sorted according to the users liking (with exception of the actions).
There is an option to output the process and the process steps to a PDF document in case you want to share the process with other people which do not have access to your companies Conformatix instance.
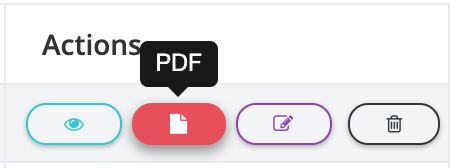
A formatted pdf file will be generated and displayed in a new tab within your browser.
The actions are rights based, meaning that based on your user type the actions can display more or less buttons.
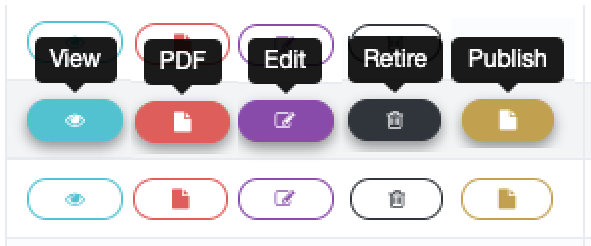
If you are assigned a manager or administrator role, below the page there will be a "New Process" section.
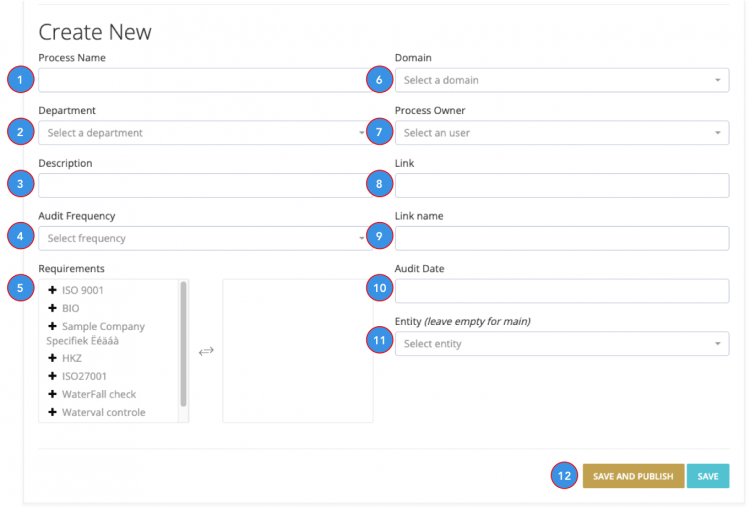
- Process Name: Please enter a name here that suits the process.
- Department: Please select the department this process is linked to.
- Description: Please enter a description here that suits the process.
- Audit Frequencies: please select from one of the possible options.
- Daily
- Weekly
- Bi-Weekly
- Monthly
- Quarterly
- Twice per year
- Yearly
- 2,5 Years
- Requirements: Here you can link your requirements from each of the Norms created in the system in the compliance section.
- Domain: This is the domain to which this process is bound to.
Select a domain from the drop-down. This list is populated from the values entered in the administration section - Process Owner: Select the user who owns this process from the list. You can hit a space to see the user lists or type characters to filter the user list. Then select the appropriate owner.
- Link: This is an optional field that allows you point to a resource for this process. The link can be any url both internal and external. However, if it links to a system that requires authentication, the user clicking the link will go to the appropriate link address only when authenticated. Else the user will land on the authentication screen of that application.
- Link name: Here an intuitive name can be given that displays instead of the link itself for more usability.
- Audit Date: The date when the first audit should be performed.
Note: After you set the audit frequency on the process, please note that it can be influenced by requirements or an underlying process step. Audit planning is based on a waterfall taking process, process steps(s) and all linked requirements into account. The earliest date always prevails. - Entity: Here you can select an entity. Entities should be entered into the system at the administration before they can selected here.
- Save & Publish or Save: With the save and publish, the process will be directly visible to all users. When only save is used, one can save the process for review or continue work on a later moment. A saved but unpublished, process can be published form the action buttons as well.
Once a process and is saved and published and you have the appropriate role or rights, you may also see the "Register Audit" button. This button will allow an internal or external auditor to put the audit results directly into the system. Based on the results, an issue can be generated as well. See more about registering an audit here.
Process steps
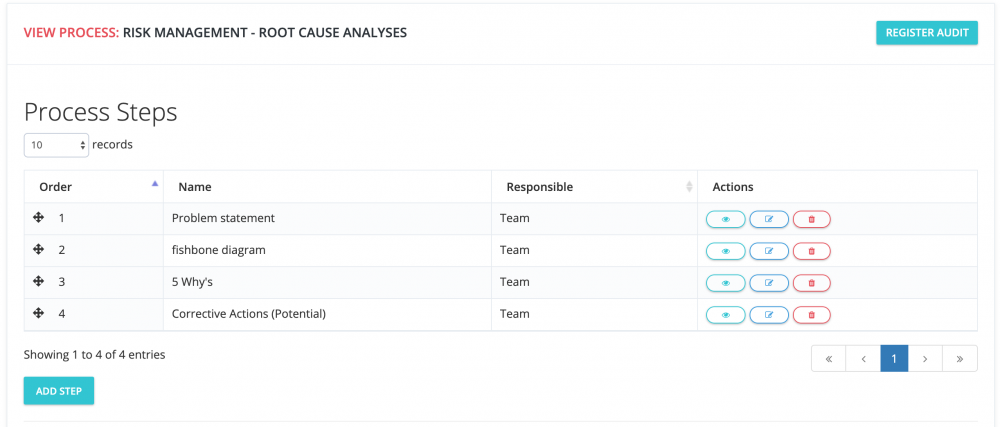
Each process can have one or more process steps. Based on user rights you can view, edit, create pdf, add, or remove a process step. If you are able to edit a process step the following screen will show.
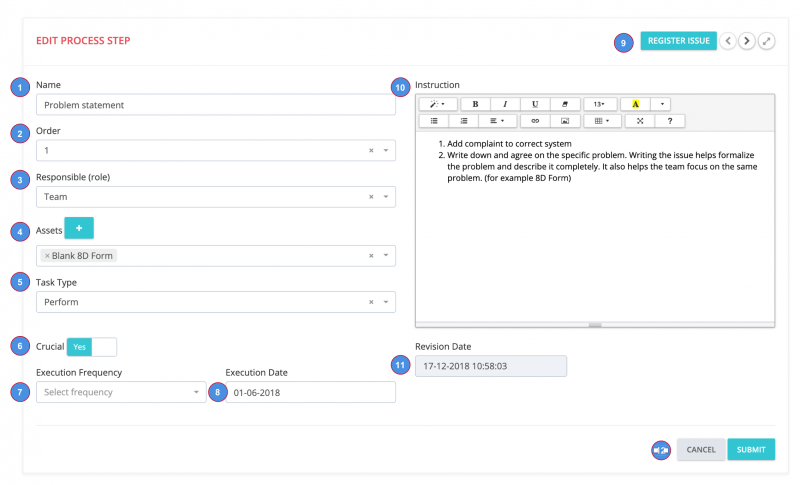
- Process Step Name: Please enter a name here that suits the Step in this process.
- Order: Set the order of the process step.
- Responsible role: Please select a responsible role.
- Assets: The [+] will allow you to add an asset without leaving this screen when the asset is not found from the selector.
- Task Type: select the type belonging to this step.
- Crucial: Makes this process step crucial in your process. When this selector is set to yes, the following two fields marked as 7 & 8 become visible.
- Execution Frequency: Select the frequency of execution that is applicable for this process step:
- Daily
- Weekly
- Bi-Weekly
- Monthly
- Quarterly
- Twice per year
- Yearly
- 2,5 Years
- Execution date: This field wil set your starting date for first execution
- Register Issue, Previous & Next step and maximize screen:
- Register issue allows you to register an issue. More detailed desciption can be found in the Audit section.
- The previous < and next > buttons allow you to browse through the process steps easily.
- Mind that this might lose any unsaved data. A warning message will show if this is the case.
- Maximize screen, allows you to edit the step in full screen mode.
- Instructions: Here the instructions for the process step can be described. Please make sure that the instructions are easy to understand and read.
- Revision date: The system will keep track of all changes and will mark them in the audit trail with a date & time stamp.
- Cancel / Submit: This will either save your changes or cancel the edit mode.