
Manage Issues
Back to Issues
As process owners, you will be able to manage “your” issues and issues that still require attention from this screen.
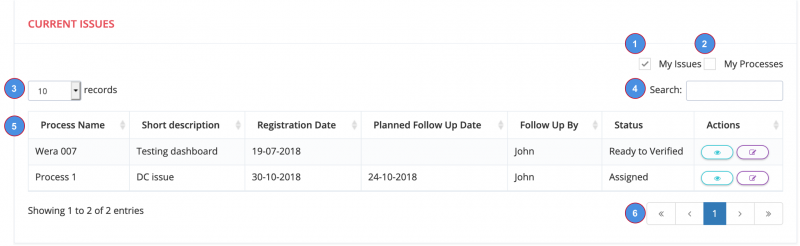
Use the select boxes to display:
- Issues that you created
- Issues that are linked to processes for which you are the process owner
- Number of issues to display on one page
- You can also enter a term in the search box to find an issue. The filter changes the grid based on your input.
- This grid displays the issues that are active and is based on the filters you activated. Each column header can be clicked to sort the grid accordingly. The action buttons will let you view or edit the issue.
- In case the list holds more issues that fit on the screen, the page selector will allow you to navigate through the screens.
Manage an Issue (Edit from the action menu)
- Short Description: The short description given by the issue-creator.
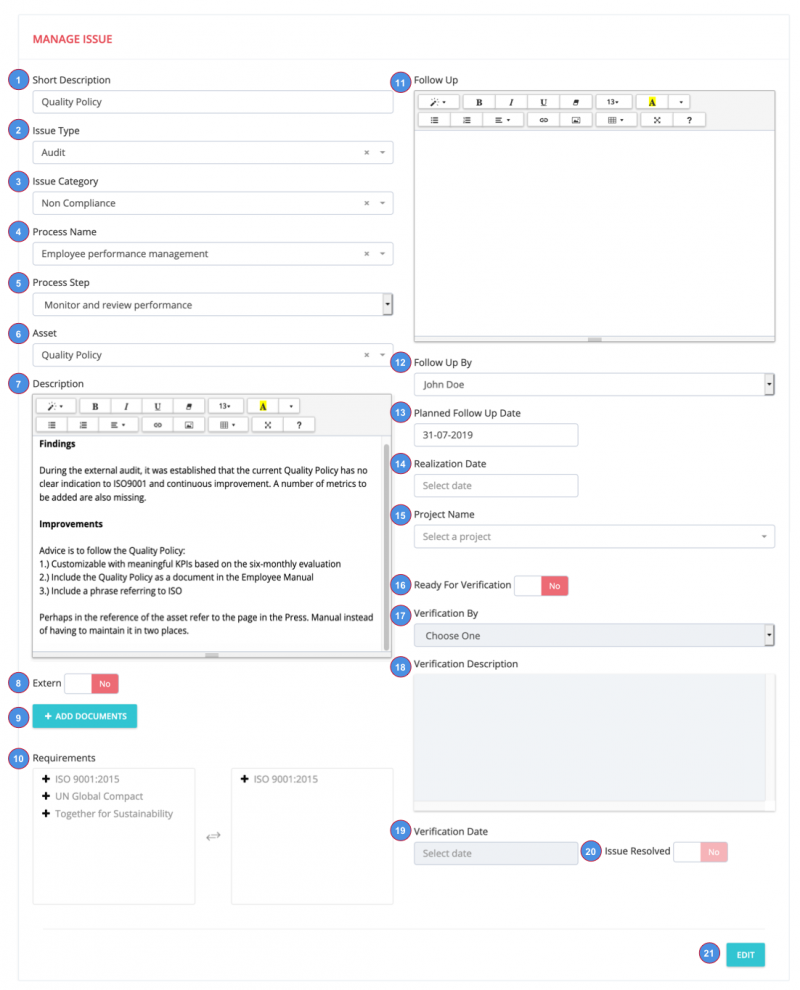
- Issue Type: The Issue Type selected by the issue-creator.
- Issue Category: The Issue Category selected by the issue-creator.
- Process Name: The actual Process selected by the issue-creator.
- Process Step: The Process Step selected by the issue-creator.
- Asset: The Asset selected by the issue-creator.
The values 1 to 6 above can be amended based on the managers assessment of the issue. - Description: This is where the issue-creator wrote a detailed description of the issue encountered. This should be assessed by the process owner and based on this the issue should be assigned to a user to be addressed accordingly.
- Extern: Set this to Yes, if the issue is related to an external or outsourced part
- Add Documents: Allows you to add documents to this issue
- Requirements: From all the norms entered in your Conformatix instance, you can amend the issue creators’ choice as needed and select one or multiple requirements or even complete chapters if you think they are affected by this issue. You can open a norm to present the underlying requirements by pressing the "+" (plus). The selected requirements from the list will appear in the box on the right. You can deselect one in case you made an error.
- Follow Up: This is where you should write your follow-up notes/instructions to the assigned user to address this issue.
- Follow Up By: Select a user form the list (press a spacebar for all names). The selected user should take action.
- Planned Follow Up Date: the planned deadline to have the issue resolved.
- Realization date: the date of the actual resolution of the issue.
- Project name: In case this issue can be linked to a project, you can select it here from the projectlist.
- Ready for verification: Once the issue is resolved, it should be verified by a manager to ensure it has been properly addressed.
- Verification By: Select a user from the list (press a spacebar for all names) this user confirms the issue is address properly.
- Verification description: The verification user can add notes regarding the verification process.
- Verification date: Select the date of verification
- Issue Resolved: Set to yes if the issue is resolved
- Edit: Press edit to save the issue